Easy way to build a virtual cluster with KVM
Updated on 16 May, 2021. The quality of the original version is not satisfying. I've rearranged this article to make it easier to read, and updated some state-of-art approaches widely used today.
This is my first post written in English, and this post is written for my "underboss" and general Linux users who has a little experience on virtual machines. This time, we are going to build our virtual cluster that is similar to old-school supercomputers, which means our configuration will be some kind of outdated and ugly compared to the latest fancy new clusters, but this configuration is much close to mainstream supercomputers in real world.
Overview
This tutorial mainly focuses on building a simple cluster in a simple way. Here is the list about the software we will install, and the architecture we will construct later. But, we will discuss some state-of-art technologies in the last section Advanced Topic to help you build a much powerful cluster in practice.
Software (Minimal Requirements)
- Host
- OS: Ubuntu Server LTS (recommended 18.04 or later)
- Virtual Machine Hypervisor: KVM + QEMU +
virt-manager
- Guest
- OS: Ubuntu Server LTS
- Shared Storage: NFS
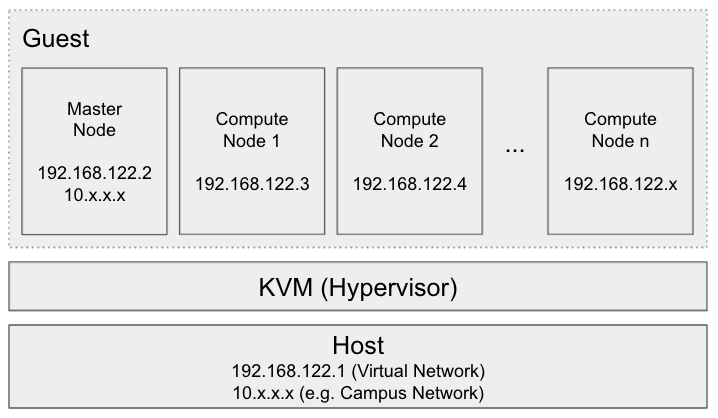
Architecture
In real world, there are many ways to categorize the nodes of a cluster. For example,
- Compute Node: Run user applications.
- Storage Node: Provide shared storage
- Master Node: Monitor the cluster and schedule jobs
- Login Node: Provide access points for regular users
We let the Master Node in our virtual cluster takes the responsibilities of Storage Node and Login Node. It is fine to merge Master Node, Storage Node, and Login Node together if this virtual cluster is not built for production environment.
Clusters vs PC
To let you have a better understanding of the concept of what we called cluster, I would like to introduce several different characteristics of clusters compared to a regular PC.
Shared Storage
Most of the clusters I used before share their storage, because it make the environment consistent. For example, when a user login an arbitrary node, the exact same .bashrc will be loaded. I've listed some important directories that are shared among clusters.
/home: Directory storing user data/opt: Shared software and libraries (e.g. Intel Compiler)
SSH Login without Password
Some distributed programs may rely on SSH to control remote machines, such as MPI. Thus, setting up password-less SSH login is required.
User Permission
A regular user should not be granted superuser privileges FOREVER if you don't want anybody abuse the permission to crash the system. Therefore, only the administrators can access to the critical system configuration and install software for all users. The regular user should use the preinstalled software or install software in a gentle way. For instance, using Conda to install software to their home directory or compiling the software from source code. As for account management, we will cover this in Advanced Topic.
Job Scheduler
Sometimes we may face the problem of lacking computational resources. This usually occurs in supercomputers since there are some user applications requesting a large amount of resources at the same time. Thus, a job scheduler will allow users to submit their applications and queue for the resources. Since it is not a mandatory component of our cluster, this topic will be discussed further in Advanced Topic.
Set up KVM hypervisor on Host
You probably have heard VMware, Hyper-V or Virtualbox. KVM is similar to them, which is also capable of creating a highly-isolated virtual environment.
Make sure Virtualization support is enabled
Some manufacturers disabled CPU Virtualization support for security reasons. Please check your BIOS setting and enable CPU Virtualization support. Besides, KVM kernel module is activated on Ubuntu by default. If you are unsure whether everything is correct, this article will guide you to perform some extra examinations.
Install necessary software
The following simple command will install everything we need, including KVM hypervisor. Note that apt is the corresponding packet manager for Ubuntu, just like yum for CentOS.
1 | $ sudo apt install virt-manager |
Launch GUI VM Manager
It is quite hard to create virtual machines under command line interface (CLI) because you have to manually specify a bunch of arguments. Luckily, there is a powerful graphical tool to manage virtual machines, and also there is a simple way called X11 forwarding, which could let a graphical application running on the remote server appear on your screen by forwarding and rendering the graphical data on your computer.

For Linux / Mac User
For Mac User, one additional software XQuartz is required. Click here to download.
Append the flag -X to ssh command, then the function X11 Forwarding will be enabled.
1 | local$ ssh -X 10.x.x.x # Your Host's IP |
Then you will notice virt-manger is already appeared on your screen.
For Windows User
One additional software called VcXsrv is required. Click here to download. Open it, follow the path Multiple windows -> Start a program -> Start a program on remote computer, and fill in your information. Remote program could be virt-manager.
Create the first virtual machine
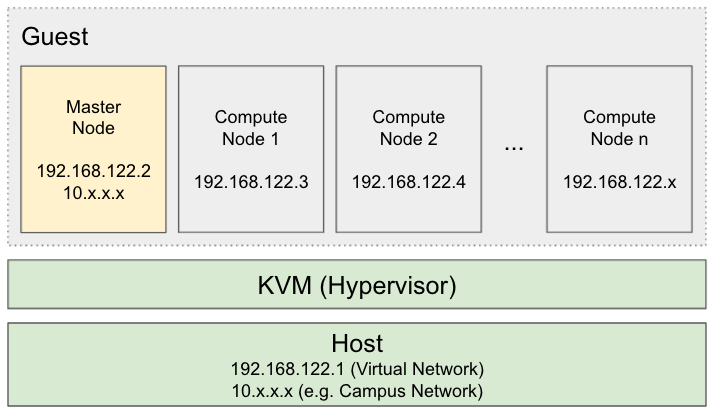
So far, what we have done is colored green, and what we need to configure is colored yellow.
Create a virtual machine by clicking  , and configure it as what you want. It is recommended that the memory is larger than 1GiB, and the disk is larger than 20GiB. And I prefer to use CD Image ISO File to install the system. Note that currently this VM should have exact one virtual network adapter working under NAT mode.
Some Optional Configurations
- CPU and Memory
Copy host CPU configuration: helps Guest OS to identify CPU instruction set correctlyManually set CPU topology: may improve performance on NUMA architecture.- Disk
qcow: will preallocates a lot of spacevmdk: allocates the space on demandVirtIO: improves IO performance- Network
NAT: connects to the virtual networkmacvtap/Bridge: connects to the external network
- A known bug is that
VirtIO: improves IO performance- Display VNC
Spice/VNC: may fix the problem if you cannot input anything to virtual machines
Then install Ubuntu Server LTS in your favorite way, but don't forget to install OpenSSH Server.
Configure nodes (1st time)
Our approach to create multiple nodes is to clone the existing nodes. Thus, every modification to the configuration of Master Node will be applied to all the nodes we will have in the future.
Install necessary software
1 | node0$ sudo apt install nfs-kernel-server |
Create User Accounts (Optional)
For now, this step is optional because we could create accounts after cloning nodes.
1 | node0$ sudo adduser user1 # Create a user called user1 |
Create /opt directory
/opt is a conventional directory that stores the shared software and libraries, but Ubuntu won't create it by default.
1 | $ sudo mkdir -p /opt |
Setup SSH Login without Password
For every user account, execute the following command, and don't forget the root account.
1 | user1@node0$ sudo su - user2 # Login as user2 |
Setup sudo without Password (Optional)
Perhaps you are tired with typing the password when acquiring superuser permissions. Setting password-less sudo may degrade the security of the system, but it is really convenient.
1 | node0$ sudo visudo |
And replace this line with the content below.
1 | # %sudo ALL=(ALL:ALL) ALL |
Clean up
/etc/machine-id might be generated when you install some software or do something else. However, this ID should vary from machine to machine. If two machines share the same ID, they may get the same IP address from the DHCP server. Therefore, this file should keep empty. Additionally, we utilize cloud-init to generate a new SSH ID for the new machine.
1 | node0$ sudo su |
Then shutdown Master Node.
1 | node0# shutdown now |
Clone nodes (Master -> Compute 1)

As we mentioned earlier, all the nodes except Master Node is made by cloning. virt-clone is a good utility to clone virtual machines. Here is the usage.
1 | vmhost$ sudo virt-clone -o node0 -n node1 --auto-clone |
After that, we can notice node1 shown in the window.

Configure nodes (2nd time)
On All Nodes
Check IP address
Check IP addresses of all the existing nodes.
1 | $ ip a |
And write them to the file hosts.txt on Master Node.
1 | 192.168.122.154 node0 |
Note that all nodes will share the same hostname with Master Node temporarily, and you should specify the hostnames in hosts.txt manually.
On Master Node
Add a network adapter
So far, all the virtual machines have connected to the virtual network (192.168.122.x), but this subnet cannot be accessed by external machines in other subnet (e.g. our campus network 10.x.x.x). Thus, we need to add another adapter to expose our Master Node as the login node.
Click  to modify the hardware configuration of Master Node. Then click
 Add Hardware, select Network, then change the network source from NAT to macvtap. Make sure you choose the correct host adapter, which should connect to external network, like campus network.

However, the stupid Ubuntu will not automatically initialize the new virtual adapter like Windows. Therefore, we have to manually configure this adapter.
First, figure out what is the name of the new adapter.
1 | node0$ ip a |
Our new adapter is called ens9. Then modify the file /etc/netplan/xxx.yaml to add the configuration of ens9.
1 | network: |
Finally, reboot to apply the new configuration.
Export NFS Storage
Modify the file /etc/exports (sudo required), add the following lines.
1 | /home 192.168.122.0/24(rw,sync,no_root_squash,no_subtree_check) |
Then restart NFS service.
1 | $ sudo service nfs-kernel-server restart |
On Compute Node 1
Import NFS Storage
Add the following lines at the end of /etc/fstab (sudo required), then reboot.
1 | 192.168.122.154:/home /home nfs auto,nofail,noatime,nolock,intr,tcp,actimeo=1800 0 0 |
Note that this configuration is permanent. The temporary approach is listed here.
2
$ sudo mount 192.168.122.10:/opt /tmp/opt
Clean up again
Refer to Clean up section to clean up Compute Node 1.
Clone nodes (Compute 1 -> Compute N)

Refer to Clone nodes (Master -> Compute 1) section and make remaining nodes.
Set Hostname and Hosts
This is the final step of building our virtual cluster. Do you remember the file hosts.txt, which contains all the IP addresses and the new hostnames? Now it is time to utilize that file to set hostnames and /etc/hosts file. Assume the content of hosts.txt is,
1 | 192.168.122.154 node0 |
The magic command below will automatically set the correct hostname and hosts file for each node listed in hosts.txt. Note that this command must be executed by root.
1 | TMP=$(mktemp) && cat hosts.txt | awk -v hosts="$(base64 -w 0 hosts.txt)" '{printf "ssh -o StrictHostKeyChecking=no %s \"echo %s | base64 -d >> /etc/hosts\" & \nssh -o StrictHostKeyChecking=no %s \"hostnamectl set-hostname %s\" & \n", $1, hosts, $1, $2}' > $TMP && bash $TMP && rm $TMP && echo "OK" |
This is the end of the primary part of this tutorial. You have completed all necessary steps to build your toy cluster. Enjoy it!
Advanced Topic
Here are some keywords you can search on Google if you are interested. I will keep updating this list in the future.
OS Deployment
- cloud-init
- ansible-playbook
- Terraform
- MAAS
Job Scheduler
- IBM Platform LSF
- Slurm
- PBS
Centralized Authentication
- LDAP + Kerberos
- LDAP + NSLCD + NSCD
Distributed Filesystem
- BeeGFS
- Ceph
- Lustre
Package Manager
- Environment Modules
- Spack
- Conda
Container
- NVIDIA-Docker
- Singularity
Cluster Status Monitor
- Grafana
Terminal
- Terminator / iTerm
- ClusterSSH / csshX
- tmux-cssh
- ClusterShell
Acknowledgment
- Tsinghua Student Supercomputing Team / TUNA